- Home
- Knowledge Base
- Settings in Call Center Client
- Call Center Settings – General Tab
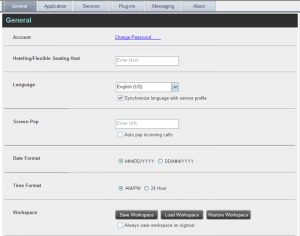
You use the General tab of the Call Center Settings page to configure miscellaneous settings that improve the usability of Call Center.
The following subsections describe the settings that can be configured on this tab:
Account
You use this area to change your TPx password.
Call Center shares logon credentials with other TPx services. When you change your password in Call Center, remember to use this new password when accessing UCx or the UCx Web Portal.
NOTE: The password you enter must meet the password requirements set by TPx. Contact us with any questions.
To change your password:
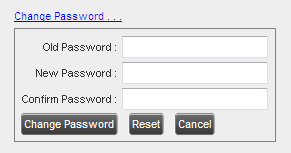
- Click the Change Password The section expands, allowing you to change your password.
- Enter your current and new password and click Change Password.
Note that the Reset button does not reset your password. It only clears the input boxes.
Hoteling/Flexible Seating Host
This setting allows you to configure the Hoteling Host or Flexible Seating Host, which is required when you use Call Center from a hot desk or other shared device. This way, if you use the same Hoteling or Flexible Seating device each time, you do not need to enter this information every time you sign in to Call Center.
In the text box, enter the user name of the Hoteling Host or Flexible Seating Host that corresponds to the desk or device you are using.
Language
The language settings allow you to select the language of the Call Center user interface.
- The drop-down list lists the languages available in your edition of Call Center. To change the language, select a new language from the list.
- Synchronize language to my profile – This box, when checked, synchronizes the Call Center language with your TPx profile and ignores the language selection on this page.
Screen Pop
You can use screen pop settings to configure the URL that may be launched on incoming calls.
NOTE: To properly configure Screen Pop settings, we recommend that you work with your company admin or with TPx.
- Enter URL – This text box allows you to enter the URL address of the web page that Call Center opens using the default browser when you click the Web Pop URL button in the Call Notification pop-up window.
- Auto pop for incoming calls – When this option is checked, Call Center launches the Web Pop URL without your having to click on the Web Pop URL button in the Call Notification pop-up window for each incoming call.
The URL can point to any URL address, but typically points to a web application that parses optional call parameters and passes them to a Customer Relationship Management (CRM) application or other database.
There are a number of optional parameters that the client can pass to the browser. The following list summarizes these parameters.
- _USER_: The user’s ID. (Note that in this case the user is the TPx Call Center Subscriber)
- _FIRST_: The first name of the user
- _LAST_: The last name of the user
- _EMAIL_: The e-mail address of the user
- _GROUP_: The name of the TPx group the user belongs to
- _SERVICE_PROVIDER_: The name of the service provider the user belongs to
- _PHONE_: The phone number of the user
- _REMOTE_PHONE_: The phone number of the remote party
- _REMOTE_NAME_: The name of the remote party (when available)
- _CALL_TYPE_: “Incoming”, “Outgoing”, or “Alerting”
- _DNIS_NAME_: The name of the DNIS on which the call was received
- _DNIS_PHONE_: The phone number of the DNIS on which the call was received
- _REDIRECTED_NAME_1__ , __REDIRECTED_NAME_2__, and so on: The name of a party to whom the call was redirected prior to being delivered to you, from the most recent to the least recent
- __REDIRECTED_PHONE_1__, __REDIRECTED_PHONE_1__, and so on: The phone number of a party to whom the call was redirected prior to being delivered to you, from the most recent to the least recent
- _REDIRECTED_USERID_1__, __REDIRECTED_USERID_1__, and so on: The user ID of a party to whom the call was redirected prior to being delivered to you, from the most recent to the least recent
NOTE: The maximum number of redirections that can be displayed on a Web Pop URL page is configured by your administrator.
Date Format
This setting allows you to select the format for displaying dates in reports. The format is used for all dates that are included in generated reports. The possible options are MM/DD/YYYY and DD/MM/YYYY.
Time Format
This setting allows you to select the format all times that are included in generated reports. The selected time format is also used to display the time in the chat logs. The possible options are AM/PM and 24 Hours.
Note that this setting does not impact the format in which event duration is reported in generated reports. It is always DD:HH:MM:SS.
Workspace
Call Center allows you to customize elements of your workspace, such as the size and placement of windows on the desktop. The system remembers the setup between sessions.
The following elements can be customized:
- The size and position of the web browser window in which the main interface is displayed
- The size of the panes (Call Console, Contacts, and Queued Calls)
- The size and position of the Dashboard window
- The size and position of any Report window
NOTE: This functionality does not work in Internet Explorer (all versions) or Firefox (version 7 and later).
NOTE 2: The browser window running Call Center should be at least 1024 x 768 pixels in size.
NOTE 3: When a window is vertically resized, the panes do not always resize to fill the window. To resize a window, drag the window from the bottom right-hand corner or collapse and then expand the panes after resizing to adjust them to the window.
The Workspace menu includes these buttons:
- Save Workspace –Saves the current workspace.
- Load Workspace –Arranges your workspace according to the last saved configuration.
- Restore to Default –Restores the workspace to the system default configuration.
- Always save your workspace on signout – When you sign out from a client, Call Center asks you whether you want to save your current workspace. To save your workspace automatically when signing out, without being asked, check the Always save workspace on signout
To customize your workspace:
- Arrange the windows the way you like.
- Click the Save Workspace button to save the current configuration. To restore the system default, click Restore to Default.
- At any time to return to the last saved configuration, click the Load Workspace button.


